On the Dashboard you will find all apps which you have either created or in which you participate. Through the (+ CheckR App)-button you can also create new apps. The filter function can be used to quickly find an app. The dashboard is shown directly after login or can be accessed by clicking on Apps in the header from any other CheckR page.
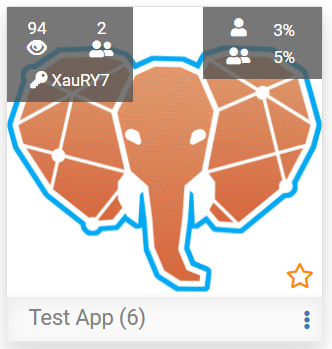
On the dashboard, all the apps you have access to are displayed as tiles. These tiles give a brief overview of the app:
Top left corner: The number of visits , the number of participants , and the key for app access for participants.
Top right corner: Your own Knowledge Level as well as the Community Knowledge Level (provided it has been approved by the admin).
On the bottom: Star-icon to mark favorites, Name of the app and the sum of the number of questions + contents. Furthermore, you can click on the three dots to open the administration menu. In this you can copy/share the app key, copy the whole app or delete/archive it. Non-admins clicking on this, will find the option to leave the app in this menu.
On the dashboard, you can create a new app by clicking on the (+ CheckR App)-button.
As a first step, provide general information (name, description, image) of the CheckR app. It is recommended to create the app initially after entering the first key-data by clicking on the Create-CheckR-App button. The app is now stored in the system and can be already used if required. After the creation you will be redirected to the admin area of the KnowledgeCheckR app. Changes and additions to the app can be made at any time.
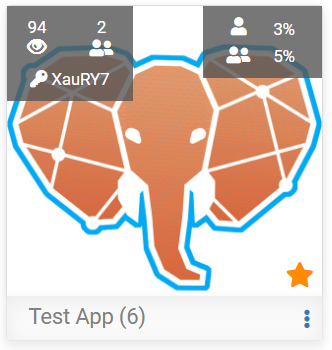
CheckR-Apps that you use frequently can be marked as favorites. This marking affects the sorting of the CheckR-Apps on the dashboard. Apps that have been marked as favorites are displayed first in the sections.
To mark an app as a favorite, hover the mouse over the tile of the desired app and then click on the star that appears. After clicking on the star it changes to , to show you which apps have already been marked as favorite.This marking can be removed by clicking on a star again. You can also mark/remove the app as a favorite in the administration menu .
With the Knowledge-check mode you can test or expand your knowledge by answering questions.
For each category displayed, you can see the number of questions it contains. If the category is highlighted in bold, it means that there are still unanswered questions. To the right of each category you can also see your own knowledge level for this category as well as the community knowledge level (provided it has been approved by the admin).
The knowledge decay represents the curve of forgetting - the longer a participant doesn't engage with the topics of the questions, the lower the knowledge level becomes. After 4 weeks, the knowledge level starts to decrease continuously. This also affects the color marking and ranking of a question.
With the Training mode you can improve your knowledge by viewing contents as well as answering questions.
For each category displayed, you can see the sum of questions + contents contained in it. If the category is highlighted in bold, it means that there are still unanswered questions or not viewed contents in it.To the right of each category you can also see your own knowledge level for this category as well as the community knowledge level (provided it has been approved by the admin).
The difference between the two is that the training mode can also include contents. A content is an extended form of conveying knowledge and can have different formats (texts, images, external documents, videos, ...).
Competitions can be used for exam preparation or just for practice. There are 3 different game modes. The best three users of a competition will be shown to all participants. The ranking is composed of the total score and the time it took to complete the Competition.
As an admin you can create a new Competitions or manage already created Competitions in the admin area under the "Competitions" tab. The first thing to do with any competition is to provide general information such as name of the competition, start and end date as well as duration of the competition. After that, you define a question pool or sections which should appear in the competition. Furthermore, there are advanced settings you can choose from.
Simple Game: Simplest game mode. Questions released for the competition are asked to the participants.
Time Rush: Participants answer questions while a timer is running. There are 3 levels of difficulty to choose from (beginner, advanced and expert). These difficulty levels affect the time participants have to answer all questions.
Sudden Death: The participants answer as many questions as possible. At the first wrong answer the competition is over for the participant.
Limit the number of competition tries per participant: Limitation of the maximum number of attempts per participant (otherwise unlimited tries within the duration of the competition)
Competition can only be started with a key: Competition can be found and started by participants ONLY by means of key or complete link. The Competition is not visible to participants on the Competition page of the CheckR app.
Only selected participants can participate in the Competition: The desired participants can be specified here. Attention: if active, only the listed participants can take part in the Competition.
Send reminder email to participants: Here the participants can be reminded of the Competition
The question types of a competition are automatically evaluated. Participants get the result directly after the competition. The best three participants of a competition will be shown to all participants. Admins can also view the results of all participants in the list of participants of the competition in the admin area.
Checks are exams. There, participants can answer a certain number of questions from a defined question set (from the app) randomly or in a specific order.
As an admin you can create a new Check or manage already created Checks in the admin area under the Checks tab. The first thing to do with any exam is to provide general information such as name of the exam, start and end date as well as duration of the exam. After that, you define a question pool or exam sections which should appear in the exam. Furthermore, there are advanced settings that can be defined.
Sections allow you to divide an exam into smaller parts and assign questions to those parts. Sections are displayed in sequence. For each section, an individual section duration can be set in which a participant can answer questions of the section. If a section is ended prematurely, the remaining time of the section is forfeited. Once a section is completed, no more changes can be made and participants are directed to the next section.
Creation of sections: In the first step, select the categories from which questions will be asked in this section. If there is a check mark in front of the category name, all questions of this category will be given to the question pool of the section. If required, individual questions of a category can also be included or excluded.
If this setting is deactivated, the questions are asked to the participants in the order selected before. With the activation of this setting there are two possibilities:
Random order of _ questions: _ random questions from the selected question pool are asked to a participant
Fixed order of questions/contents: Set an order of the questions yourself
Disable questions of this check during exercise: Questions that appear in this Check are no longer displayed in Knowledge-Check mode and Training mode.
Check start with key only: Exam can be found and started by participants ONLY by means of key or complete link. The Check is not visible to participants on the Check page of the CheckR app.
Only selected participants can participate in the Check: The desired participants can be specified here. Attention: if active, only the listed participants can take part in the exam.
Additional input fields for identification of participants: Here you can define further fields, which must be filled out before the participant can start the exam.
Send reminder email to participants: Here the participants can be reminded of the exam (if the group of participants is already known before the exam).
Show check result immediately after submission: Participants see the achieved score immediately after the submission of the check, if enabled. In case the check includes free-text questions, the score does not include any points for those questions since those questions have to be manually evaluated by the admins
Enable chat function: If enabled, all participants can send messages to the admins. During the exam time all messages are visible for all participants. After the exam deadline the messages are visible to the admins only.
Request taking pictures: 1. At start: webcam image is requested to start the exam. 2. At start and random during the check: Random pictures are taken during the check and automatically checked for abnormalities (the user does not know when pictures will be taken during the check). 3. At start and in in case of abnormalities during the check: A picture is taken as soon as the user shows suspicious behavior.
Advanced cheat prevention: 1. Manipulation detection: Monitoring, if the user opens other windows or switches the browser during the check - there is a clear indication in positive cases (cheat detection). 2. Record individual behavior: Time spent per question as well as records of mouse activity.
1. Download the webcam app from the Play- or App-Store onto your smartphone. Download and install the corresponding program on your computer. 2. Connect the smartphone to the computer via Wi-Fi or USB. 3. Launch the app on your phone and the program on your computer. 4. Now select your webcam app in the browser (e.g.: Firefox) as the source for the video signal.
For further information or assistance, please refer to the documentation of the respective app manufacturer.
Exam Chat is a chat function that is available during an exam as a direct communication medium between the participants and the admins. This means that the entire exam process can take place within KnowledgeCheckR and the use of additional software such as WebEx, BigBlueButton, etc. is no longer necessary. This chat function must be explicitly activated by the admin in the settings of the Check.
The exam chat is available for all participants during the exam (if the function was enabled by the admin). After or before the exam the chat is not accessible for participants. If a participant has the exam open, they will find a chat icon in the upper right corner with which you can open the chat. All messages remain visible to all participants for the entire duration of the Check. The messages are sorted by date of creation.
Click on the chat icon in your CheckR app. Here you will now find all chats of the Checks where the chat function has been activated. If you click on a chat, you will find all messages which are/were sent during the Check. The exam chat will be available for admins regardless of the deadline of the Check. 6-12 months after the exam, the exam chat will be automatically deleted along with the exam files. Admins will be informed about this separately in advance.
Most question types are scored automatically. Participants get the result displayed directly after the Check. Only the free text answers have to be corrected manually (the grading is done directly in the settings of the exam below the list of participants). Using the slider below the answer, you can set the points the participant achieved. To save the evaluation, click on the Save-button at the bottom right and then on "Save Evaluations".
A Check report can be generated as PDF or Excel with the detailed answers of the participants. Within a Check you will find the option Export Check Data at the end of all settings. After a click on this option, a window opens where you can choose if you want to generate a PDF export or Excel export. Note that "Generate Report" actually only generates the report and it can be downloaded with the button Download Check Data to the right of Export Check Data.
In the respective Check, after the settings, you will find a list of participants who have completed the check. This list can be sorted in descending or ascending order according to the points achieved, as well as according to the most recent participation.
Click on a participant to get more detailed information about the results. Here you can find information about when the participant started and finished the exam, as well as the number of points and total duration of the exam. An individual summary of a participant for each question can be accessed by clicking on "Summary Participant". This summary can also be downloaded as an exam report. If photos were requested during the Check, you can find them by clicking on the button "Show all user pictures".
The following icons may appear when cheat prevention settings are enabled or a Check wasn't submitted:
Fraud attempt detected: Other programs or browser windows were opened during the check.
Camera could not always be accessed
Conspicuous behavior: The time needed for answering the questions or the participant's mouse activities show anomalies. Please check the summary for more information.
Suspicious Photos: At least one photo taken during the exam was marked as suspicious.
The Check hasn't been submitted: Maybe the internet connection of the participant was broken. You can allow a late submission by clicking on the button "Late Submission ...".
If the Check of a participant has not yet been submitted although the maximum exam duration has been exceeded, it is possible that an Internet failure during submission is to be blamed. Participants that have not handed in the Check are marked in the participant list with an icon.
In the detail view of the participant, an admin can now click on the button "Late Submission ..." and may have two possibilities: 1) The Check has been encrypted and saved on the participant's computer. You can now notify the participant by e-mail so that he or she can resubmit the Check via a link. 2) The last successful auto save can be used as the final submission. Attention: Any data saved on the participant's computer can then no longer be taken into account.
In the Admin area an administrator or a co-creator can:
Adjust information and settings of an existing app
In the admin area under the edit tab you can add another administrator/co-creator. Co-Creators can also modify all content of the CheckR application. To do this, you need to enter a valid email address in the add-co-creator field and then click add. After that the whole app has to be saved! The newly added co-creator will then receive an invitation email with a link to the app.
As an admin, you can find the buttons "Generate Report" and "Generate CSV of Statistic" in the top area of the admin area.
Generate report creates a PDF, there you can also select which categories should be included in the PDF report and whether disabled questions should be included.Generate CSV of Statistic creates a CSV file, this table contains the knowledge level per category for each participant.
The App can also be accessed without registration of the user. However, if the participant does not log in, no results can be saved and the participant cannot access their progress at a later time.
The training mode is only visible if this setting has been activated. Furthermore you can activate that clicking on the app will automatically open the training mode.
Here you can set a minimum level in order for a category to be considered as passed. In addition, you can activate that participants can download a certificate after passing a category, which confirms the passing of the category.
To pass a category the knowledge level of participants in a category must therefore be greater than or equal to the set percentage value. Whether one has passed a category or not is displayed to the participants in the Knowledge-check and Training mode in the column "Status".
As an admin you can view the knowledge levels of the participants per category in the admin area: under "Edit category" click on the button []. It is also marked in color which participants have already passed the category and which have not.
You can also enable that participants get informed by email if they fall below the level. This means that if participants have previously completed a category but then fall below the required level again, they will be informed once by e-mail that they should participate again.
Categories can be used to subdivide your questions and contents. When creating a question, it has to be assigned to a specific category. Also contents must be assigned to a category to be displayed in the training mode. The order of the categories can be set arbitrarily by dragging them in the edit-category tab.
You can give categories deadlines, this is optional. Under "Edit category" you can set, change or delete deadlines via click on the button [ ]. The deadline will be shown with an icon and deadline date in the knowledge-check mode and training mode. After the chosen date, participants can no longer view or answer questions in this category. Also, the knowledge decay does not affect the knowledge level and the community knowledge level of participants after the deadline. This only affects the knowledge-check mode and training mode.
This question type has predefined answers, and the participants have to check the box of the right answers. Either only one answer or several answers can be correct. Correct answers are marked by the admin when the question is created. As soon as more than one answer is marked as correct, it is also possible to set the number of correct answers from which the question should be interpreted as correct.
Participants see a text with gaps. Next to it are elements with texts that fit into the gaps. By moving the elements to the correct position, this type of question can be answered.
In this question type, participants can enter their answers as free text. (These answers are not automatically evaluated, this has to be done manually by the admin).
Admins can evaluate answers to free text questions in the admin area under the "Evaluations" tab. This tab also shows how many unevaluated answers there are. After clicking on a participant, you can set the points the participant achieved using the slider below the answer.
1. Click on Imports to modify the imported Java packages and classes if necessary.
2. Add a sample solution of the Java method to be able to evaluate the correctness of your test cases later.
3. Add a skeleton if the participants should not start with a blank canvas.
Idea:Let the participants write the complete method, or install a bug that needs to be fixed by the participants.
4. Create as many test cases as you like to check the code of the participants for syntactic as well as semantic correctness. You can decide between Input/Output Tests and Pattern Tests.
5. Lastly, you can ensure the correctness of your previously created test cases by clicking Run Sample Solution.
An Input/Output Test compares the actual result with the expected result. The test is passed if both results match.
Answer
1. You can give the test a name and specify the points that can be achieved.
2. Under Test you can insert your test code. For example, a simple test for a method called add, which expects two parameters of type int and returns the sum, could be System.out.println(add(1,2));.
3. Next, you can define the result that is expected at the standard output or at the standard error. In the following table, you can see how the results of different data types might look like.
Data type
Notation
String
hello
Char
a
Integer
3
Float
1.1
Boolean
true
List/Set
[Hello, World]
4. The comparison method is used to decide how the actual result is compared with the expected result. You have three options to choose from:
Flexible: The actual result must match the expected result. Upper and lower case letters and spaces are ignored.
Strict: The actual result must exactly match the expected result.
Contains: The expected result must be contained in the actual result.
5. In addition, the following further settings can be made:
Hidden Test: Participants can only see whether the test was passed or not. All other information remains hidden.
Sample Test: If activated, this test and the expected result is visible in the question and thus helps the participants to better understand the question.
Prerequisite Test: Participants only receive points for the question if this test passes. If this setting is not activated and the test fails, participants have the possibility to achieve partial points for this question in a Check.
A Pattern Test checks for the presence or absence of text or programming constructs in the code. This allows you to easily check whether participants have understood and can apply the concepts they have learned.
Answer
1. You can give the test a name and specify the points that can be achieved.
2. The code can be scanned for any text or programming construct, whereby comments are ignored. It can be selected whether to check for presence or absence.
Text: The code is scanned for the specified text. You can choose between two different comparison methods:
Flexible: Upper and lower case letters and spaces are ignored.
Strict: The exact text is scanned for.
Programming Construct: The code is scanned for the selected programming construct, such as an if statement or a for loop.
Idea:Why not have participants replace a for loop with a while loop and easily check this with a pattern test?
3. In addition, the following further settings can be made:
Hidden Test: Participants can only see whether the test was passed or not. All other information remains hidden.
Sample Test: If activated, this test and the expected result is visible in the question and thus helps the participants to better understand the question.
Prerequisite Test: Participants only receive points for the question if this test passes. If this setting is not activated and the test fails, participants have the possibility to achieve partial points for this question in a Check.
For each I/O Test, a test class is generated that imports the selected Java packages and classes, contains the submitted code of the participant, and the test code that is inserted into the main method. The code is then executed on a so-called Jobe server and the actual result is compared with the expected result.
For example, a generated test class might look like this:
    //Selected Imports
    import java.util.*;
    import java.io.*;
    import java.util.stream.*;
    import java.util.regex.*;
    import java.time.*;

    public class Test {

        //Code of Participant
        public static int add(int a, int b) {
            return a + b;
        }

        public static void main(String[] args) {
            //Testcode
            System.out.println(add(1, 2));
        }
    }
Contents are an extended form of conveying knowledge and can have different formats (texts, images, external documents, videos, etc.). Contents can only be displayed in the training mode and this must be enabled in the App settings.
For contents, there is the possibility to view the knowledge level and the number of interactions with the content of each participant. To do this, click on the button which is displayed per content on the left.
In the Participants tab you can see all users who are already participants of this app and all invitations that have not yet been accepted. To invite more participants to this App click on the Invite participants-button. Now you have 2 options:
Single invitations: Input an E-mail address to invite this person.
CSV Invite: Upload a CSV file with user information that includes email address, first and last name. A template is provided.
With both versions, there is also the possibility to invite people without an invitation email as well as an optional custom invitation message.
When inviting new participants you have the possibility to write an individual invitation message. This message will be attached to the standard invitation email. However, this is completely optional.
People who have been invited but have not yet joined the CheckR app can be reminded again with an email. In the tab Participants, under the existing participants, all persons with pending invitations are listed. Here you will also find the date of the last invitation and a button to again send an invitation e-mail.
In the admin area unter the "Participants" tab you will find a button: . After clicking on this button a window opens in which you can see all participants of the CheckR-App with their average knowledge level. To see the knowledge level per category of a participant, click on the respective name.
Furthermore, you can send the participants a reminder email asking them to participate in the CheckR-App again. To do that, mark the relevant participants and click on "Send reminder". If you have already reminded someone, you will see an icon to the left of a participant's Knowledge Score: . To see the last reminder date, hover with the mouse over this icon.